NOTE:
Very often vibrators are damaged because the lubricator runs out
of oil. Therefore, make one person responsible either to keep the
lubricators filled or to check the lubricators at regular intervals.
NOTE:
For Piston Vibrators only !
The air lubricator may be filled with distilled water for the operation
of piston vibrators. The materials (teflonized aluminum and leaded
bronze) may be operated oilfree with only distilled water with excellent
results. Operation with distilled water requires a 5 to 10 times
higher flow rate than operation with oil becasue water is blown
away very quickly, while oil adheres longer to the moving parts
and the walls.
Troubleshooting
Vibrator does not start
-
Piston Vibrator
only: Remove it from the mount and hold it vertically in your
hand. Turn it on. If it runs, check starter spring inside.
-
Gumming
of oil may keep the parts stuck together (mainly for FP- and DAR-Vibrators).
Add ten drops of Kerosene (Petroleum) into the air pressure inlet
to dissolve the gumming oil.
-
If you suspect
air pressure supply blockage:
- Unscrew
silencer or exhaust hose and run the vibrator. If it operates
properly, then check the silencer or hose for clogging. If clogged,
wash out (kerosene) or replace
- Check
air pressure to localize the blockage
- at the compressor's site
- at the maintenance unit (filter-regulator-lubricator)
- at the end of the flexible tube
Vibrator does not always start
- Occurs in
Piston Vibrators because they require a few seconds OFF- time
before supplying again. Starter problems usually occur if the
OFF-time cycle is extremely short.
- The piston
may need a few seconds to be pushed by the spring into the start
position. This time depends on the manner of installation, with
a longer supply pipe between valve and vibrator extending the
OFF-time needed. Also, a clogged silencer will hinder the exhaust.
To test this possibility, remove the silencer and run the vibrator.
If it runs, then wash silencer out or replace it.
- If the
OFF-time required is short (less than 4 seconds), it is advantageous
to use a 3-way valve so that the supply pipe to the vibrator
is bled when switching OFF.
- Using
a hand-driven valve may sometimes cause starting problems if
the air pressure is not moved through quickly enough. Electrically
or pneumatically driven valves are recommended.
- Insufficiently
large tube or valve diameters may cause similar problems.
Vibrator runs too slow / Vibration power too low
New
Installations
- Vibrators
need up to 15 minutes to reach full power since excessive grease
and anticorrosives have to be moved through.
- Adjust air
pressure regulator to increase vibrator's speed
- Check that
the air supply is connected to the inlet port and not to the exhaust
port (arrow marks)
- Check that
the flexible tube is not bent.
- Check to
make sure that the inner span of the air pressure supply pipe
(Paragraph 2.4. and 6.1.2.) is wide enough and not too long. Also
check the inner span of the valves used.
- Check that
there are not too many air consumers being operated at the same
time with one air line. The consumers should be selectively controlled.
Existing
Installations
- Remove silencer
or exhaust hose. If the vibrator operates properly without them,
then the silencer or exhaust hose is probably clogged with dirt.
Wash out with petroleum (kerosene) or replace.
- Check the
air line filter for accumulation of dirt. Air supply pipe irons
may get rusty and these particles may clog the filter.
- Check the
air supply for leaks. Make sure that the compressor is working
continuously. Check to see if the flexible tube is bent.
- Eventually
the lubrication oil will gum up. Add a few drops of petroleum
(kerosene) into the air inlet port to clean.
- Check vibrator
for accumulation of dirt and clean with petroleum (kerosene).
Excessive noise during operation
High
acoustic frequency:
- The vibrator
is probably running too quickly or mounted too rigidly. Reduce
the air pressure and adjust the vibrator to its optimal working
frequency.
- The ball
of ball vibrators may be worn out and cause an increase in frequency
and a decrease in vibrating force.
Crackling
sound
- Verify that
the vibrator mounting screws are securely fixed
- If the bin
or hopper is empty, cut down air supply.
- In turbine
vibrators, ball bearings may be damaged
Repair
All
FINDEVA vibrators except the K-series can be easily dismanteld, maintained
and repaired if necessary.
The
following tools are necessary :
- Pin Wrench
Pin 4, 5, 6, 7 or 8 mm (refer to list figure 7.1.)
- Vise with
aluminum jaws
- Hammer
- For T-Turbines:
Allen key (2.5 mm : T-50/-65 ; 3 mm : T-80/-100)
|
Wrench
Pin diameter
in mm
|
Models
/ Types
|
|
R
|
DAR
|
GT
|
FP
|
|
4
|
50
|
2
|
8/10
|
12/18
|
|
5
|
65
|
3
|
13/16
|
---
|
|
6
|
80
|
4
|
20/25
|
25/35
|
|
7
|
100
|
5
|
30/36
|
---
|
|
8
|
120
|
6/7
|
40/48
|
---
|
|
Turbine
Vibrators : Pin dia. = 7 mm
|
Fig.
7.1. : Pin wrench diameter cross reference
Place
the vibrator as shown in figure 7.2. in the vise. Make sure that the
part with the end cap to be loosened is not be pressed by the vise.
Open the end cap in the same direction the rotor, ball or roller moves
(figure 7.3.). Piston Vibrator end caps or sockets should be opened
counter clockwise.
NOTE: If both end caps or the end cap and socket of a piston vibrator
are to be opened, first loosen both sides before opening. This prevents
the housing from breaking.
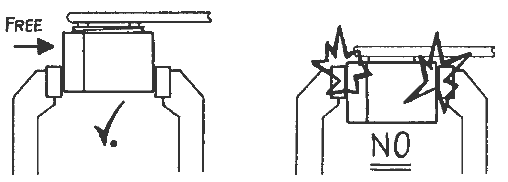
Do
not press the end cap
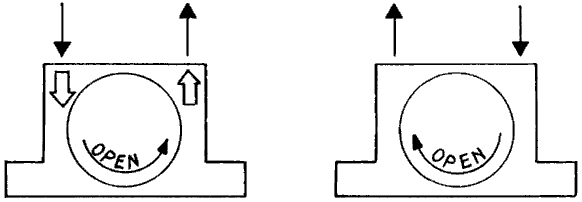
Turning
direction to open the end cap
NOTE: When changing parts, use only original parts. Other parts may
not be of the same quality and may lead to malfunction.
Ball vibrators K-series
Ball
vibrators should not be repaired since only the end caps and the ball
can be replaced. If the ball is worn out, the races will be also,
but the races can not be changed.
It
is still possible to gain a few hundred hours of operation with a
new ball.
The
only way to open the end cap is to destroy it by drilling a hole into
it. Check the races for cracks before closing again. A new end cap
can be pressed in by hand.
Roller vibrator R-series
When
opening the vibrator check both of the black end caps for grooves
due to abrasion of the roller. If grooves are visible it is an indication
to use more lubrication and that the end caps should be changed. Please
note that the end caps have right- and left-hand thread, and are sold
in matched pairs only.
Also,
check the roller race for rust, cracks, etc. Rust or other dirt particles
may cause the roller to jump, causing the race to be worn out quickly.
It
is possible to run the vibrator without the silencer plates on the
end caps but the noise level will be greatly increased, and the silencer
plates protect the vibrator from dirt entering through the exhaust
holes.
Roller vibrator DAR-series
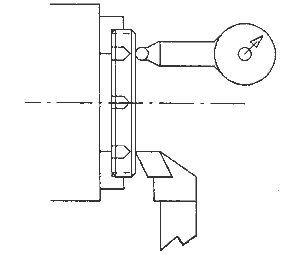
Overturn
of the end plate
Like
the R-series, the brass end caps may be worn out due to lack of lubrication
or dirt contamination. If so place the end plate in a lathe as shown
above. Check that the surface of the endplate is running true using
D.T.I., and overturn the plate until it is even again.
This
should be done before the groove is more than 30 Ám (0.03 mm).
The
total thickness of the endplate should not be less than shown below.
| DAR-type
DAR |
-2 |
-3 |
-4 |
-5 |
-6 |
-7 |
| Minimum
thickness in mm |
7 |
8 |
9 |
10 |
11 |
11 |
Minimum
thickness of the brass end plate
Also,
check the roller race for rust, cracks, etc. Rust or other dirt particles
may cause the roller to jump, causing the race to be worn out quickly.
Turbine vibrator T-series
NOTE: Before opening the threaded end cap, make sure the Allen Key Screw
on top of the housing is loosend to avoid destroying the thread.
The
Allen key screw is a 2.5 mm (T-50 and T-65) or 3 mm type (T-80 and
T-100).Open the threaded end cap counterclockwise. The other end cap
is the same used with ball vibrator K-series and should not be moved
away under normal circumstances.
The
rotor and the ball bearings on its axles can be taken out of the housing.
The ball bearings can be removed from the rotor's axles using a ball
bearing extractor.
When
reassembling the vibrator, the direction of the rotor blades is important,
but the rotor cannot be mounted the wrong way because one end of the
rotor axle contains a hole that fits into the fixed end cap.
When
using a new threaded end cap make sure that the end cap is tightend
before screwing in the Allen key screw. Now use a 4.2 mm drill (T-50
and T-65) or a 5.0 mm drill for T-80 and T-100 to spot-drill the end
cap's thread through the allen screw hole, so that the headless Allen
screw is securely blocking the end cap. Then, tighten the Allen key
screw securely and place the sticker on the side of the end cap.
If
new ball bearings are in use please note that the vibrator will need
a few minutes to work up to its nominal frequency as the grease used
in manufacturing is displaced.
When
putting the vibrator back into operation, check the lubricator to
make sure that it is operating properly and that the reservoir is
filled.
Turbine vibrator GT-series
Under
normal circumstances, the GT-Vibrator can only be openend on one side.
The rotor and the ball bearings can be taken out, and the ball bearings
can be removed from the axles very easily.
Please
note that the ball bearings are not standard, since they must be shielded
and they contain only one tenth of the standard amount of grease.
This is sufficient to guarantee optimal greasing, while a standard
amount of grease slows the frequency down considerably.
As
a temporary solution to keep the production machines running, a pair
of standard ball bearings may be used, but they must not be used longer
than a few days while waiting for new original spare bearings to arrive.
NOTE: We do not recommend the use of other than the original spare ball
bearings and will not take any responsibility for any damage resulting
from the use of standard ball bearings.
When
reassembling the vibrator, make sure that the rotor is mounted correctly.
As shown in Fig. 7.6. the pockets of the rotor must be mounted so
that the air pressure may fill them. Otherwise the rotor will turn,
but with only about 50% of frequency and vibrating force.
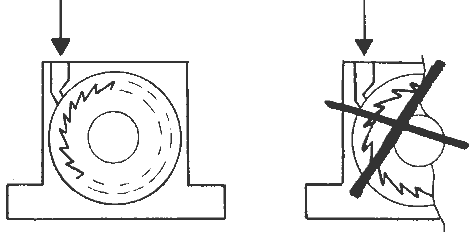
Correct
mounting of the rotor
Under
normal circumstnces a GT-vibrator will last longer than any other
type of vibrator because changing the ball bearings makes the vibrator
as good as a brand new one.
Piston vibrator FP-series
We
recommend opening the socket end (the end with the metric mounting
thread and the smaller diameter).
Check
the spring for correct length and the piston for abrasion tolerance
according to figure 7.7.
|
FP-Type
|
Nominal
Diameter / Abrasion Tolerance
|
Spring
Length Tolerance
|
|
FP-12-S
FP-12-M
FP-12-L
|
11.985
mm / -20 Ám
|
L=13
mm +/- 3 mm
L=17 mm +/- 3 mm
L=20 mm +/- 3 mm
|
|
FP-18-S
FP-18-M
FP-18-L
|
17.985
mm / -15 Ám
|
L=19
mm +/- 3 mm
L=22 mm +/- 3 mm
L=25 mm +/- 3 mm
|
|
FP-25-S
FP-25-M
FP-25-L
|
24.985
mm / -10 Ám
|
L=26
mm +/- 3 mm
L=32 mm +/- 3 mm
L=42 mm +/- 3 mm
|
|
FP-35-S
FP-35-M
FP-35-L
|
34.985
mm / -5 Ám
|
L=30
mm +/- 3 mm
L=34 mm +/- 3 mm
L=38 mm +/- 3 mm
|
Fig.
7.7. : Piston abrasion tolerance and spring length tolerance
The
vibrator will work if it is out of tolerance, but the leakage area
between piston and boring increases with the square of the diameter.
The higher the leakage the less vibrating power the vibrator is able
to generate. This is especially important with both the larger models
FP-25 and FP-35 because of their already large diameter. Hence, we
strongly recommend lubricating the piston vibrator to avoid abrasion
as much as possible.
When
reassembling the vibrator, it is important to place the spring as
shown in figure 7.8., with the smaller end of the spring against the
piston, otherwise the spring will block and damage the vibrator.
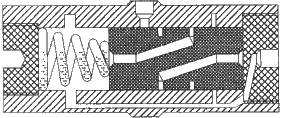

Fig.
7.8 - Correct / Incorrect installation of the spring
NEXT TO PARTS LIST

